Introduction
Many bloggers simply want to publish their content without the hassle of managing a complex CMS system. Sure, platforms like WordPress or Webflow offer quick setups with their comprehensive backends, but there's a unique satisfaction in crafting your own website or incorporating it into your marketing efforts. While most developers shy away from building their own CMS systems, they still desire complete control over their codebase. This is where the concept of a headless CMS shines. Offering an array of functionalities, including GraphQL and custom data types, headless CMS solutions are robust yet can be prohibitively costly for smaller projects.
For modest websites like the one we're discussing, an elaborate setup isn't just unnecessary; it's overkill. The goal is to find a middle ground: leveraging a cloud CMS that allows for direct code manipulation while harnessing the advantages of MDX, ensuring a blend of flexibility, control, and efficiency.
Before jumping in let me tell you what MDX is
What Is MDX?
MDX, short for Markdown eXtended, is a markup language that supports the use of JSX within Markdown documents. MDX combines the simplicity of Markdown with the power of Components. This enables you to create interactive and rich content with ease.
Here is an example of a mxd document,
# John Wick: A Thrilling Neo-Noir Action Saga

Directed by Chad Stahelski and written by Shay Hatten and Michael Finch, this epic neo-noir action thriller takes us deeper into the shadowy world of assassins, vendettas, and unyielding vengeance.

<Tip prop1="value1" prop2="value2" />

I can also include regular Markdown:

## Key Characters:
- **John Wick (Keanu Reeves)**: Our indomitable protagonist, a lethal force driven by grief and fury.
- **Bowery King (Laurence Fishburne)**: Wick's underground ally, harboring secrets and grudges.
- **Marquis Vincent Bisset de Gramont (Donnie Yen)**: A High Table member with unlimited resources.
- **The Elder (George Georgiou)****: The enigmatic figure who presides over the High Table.
The above will result in some thing below,

MDX works with many tools and websites, like Next.js, Gatsby, Nuxt, and some others that help build websites quickly. Popular websites for writing guides and manuals, such as Storybook and Docz, also recommend using MDX.
Now you know what mdx can do, Let's see a step by step guide on how to setup a blog using stubby.io and next.js.
Install Next.js
Make sure node js latest version is installed on your computer before getting started.
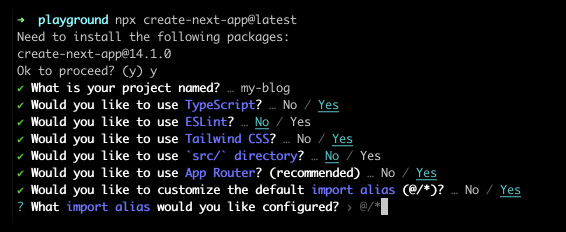
Installing next js 14, use the create-next-app tool to automatically do everything for you. To create a project, run:
npx create-next-app@latest
On installation, you'll see the following prompts:

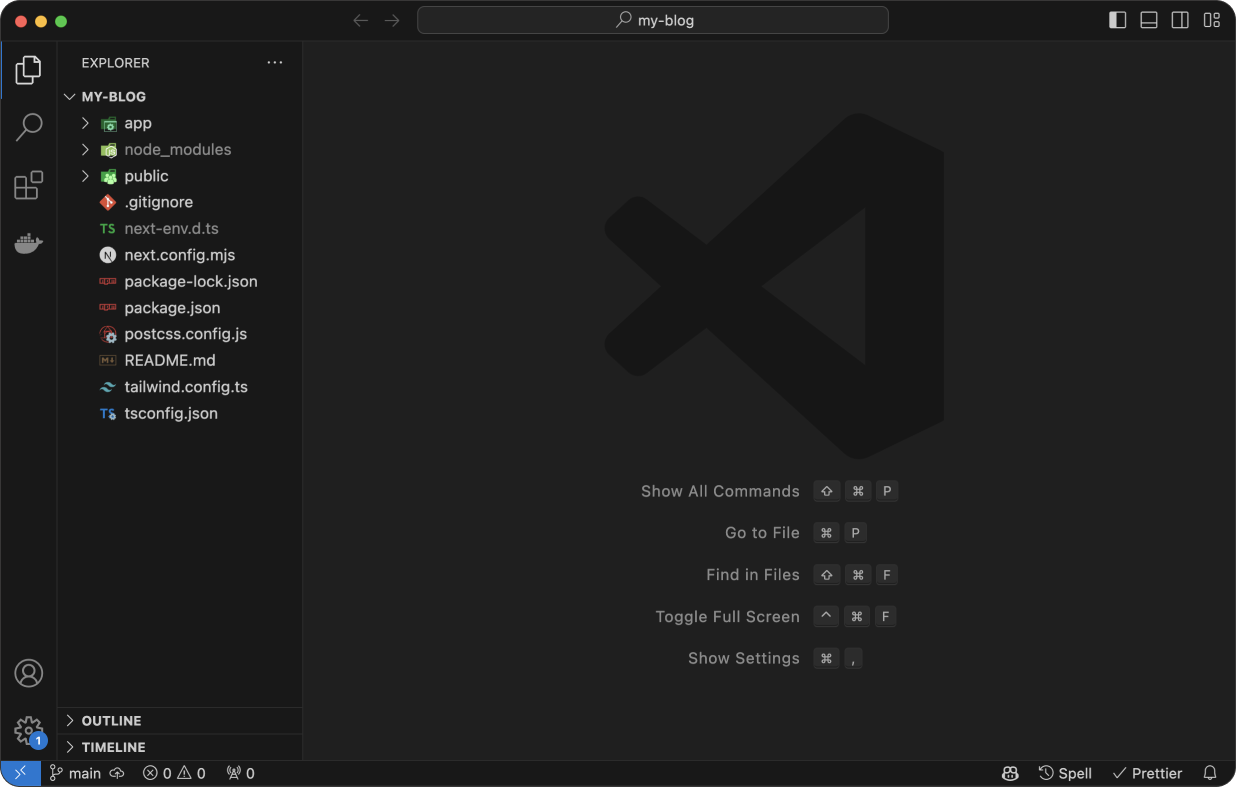
After the prompts, create-next-app will create a folder with your project name and install the required dependencies. Then open the newly created blog in vscode and the folder structure would look something like below,

Setting up your stubby.io account
- Begin by registering on Mdxify at https://app.stubby.io/login.
- Once logged in, navigate to your dashboard and click the "Create New Site" button to set up a new site.
Creating Content
- Add files and folders through the interface to organize your content
- Write your MDX content as if you're directly working within your Next.js or Nuxt.js app environment.
Creating the posts lists page
In your Next.js (version 13 or above) application, create a file named blog/page.tsx. This file will serve as the entry point for your blog.
Here's a simple example to fetch data from the server for your blog list page:
const STUBBY_API_KEY = process.env.STUBBY_BLOG_API_KEY;
// Fetch data from the server
const getData = async () => {
  const siteId = <siteID>;

  const url = `https://subby.io/api/v1/sites/${siteId}/folders?apiKey=${STUBBY_BLOG_API_KEY}`;

  try {
    const res = await fetch(url, {
      cache: "force-cache",
      next: { tags: ["posts"] },
    });

    const data = await res.json();

    if (!res.ok || res.status >= 300) return [];
    if (!isArray(data)) return [];

    return data;
  } catch (e) {
    return [];
  }
};

const BlogListPage = async () {
  const data = await getData();

  return (
    <main className="container pb-40 pt-16">
      <h1>Blog</h1>
      <ul>
        {data.map((blog: any) => {
          return <li key={blog.slug}>
            <Link href={`/blog/${data.slug}`}>{blog.name}</Link>
          </li>;
        })}
      </ul>
    </main>
  );
}

export default BlogListPage;
Building individual blog pages
Create a new file named blog/[slug]/page.tsx for individual blog posts. This file handles the rendering of each blog post based on its slug.
For fetching a single page's data
const STUBBY_API_KEY = process.env.STUBBY_BLOG_API_KEY;

const getData = async (slug: string) => {
  try {
    const siteId = <siteID>;

    const URL = `https://subby.io/api/v1/sites/${siteId}/pages/${slug}?apiKey=${STUBBY_BLOG_API_KEY}`;

    const res = await fetch(URL, {
      cache: "force-cache",
      next: { tags: [slug] },
    });

    if (res.ok && res.status < 300) {
      const data = await res.json();
      return { ...data, content: removeFrontMatter(data.content) };
    } else {
      return null;
    }
  } catch (e) {
    return null;
  }
};

const BlogView = async ({ params }: any) => {
  const { slug } = params;
  const data = await getData(slug);
  if (!data) { notFound(); }

  return (
    <div>
      <h1>{data.name}</h1>
        <article className="prose">
          <div dangerouslySetInnerHTML={{ __html: data.output.html }} />
        </article>
      </div>
    );
}

export default BlogView;
Enabling content revalidation
Consider setting up a webhook for revalidating your blog content on stubby.io whenever new content is published. This ensures your site always serves the most up-to-date content.
// api/revalidate/route.ts

import { NextRequest, NextResponse } from "next/server";
import { expireTag } from "next/cache";

export async function GET(request: NextRequest) {
  const tag = request.nextUrl.searchParams.get("tag");
  const slug = request.nextUrl.searchParams.get("slug");
  if (tag || slug) {
    if (tag) expireTag(tag);
    if (slug) expireTag(slug);

    return NextResponse.json({ revalidated: true, now: Date.now() });
  } else {
    return NextResponse.json(
      { revalidated: false, now: Date.now() },
      { status: 400 },
    );
  }
}
Now you can re-validate the content of the page by visiting localhost:3000/api/revalidate?tag=posts
What that you have dynamic blog that you update the content anytime, and the webhook will re-validate the content.
